Behind the scenes, I'm slowly working on expanding this blog, turning it into a bigger webpage of its own. I will leave blogger (even though it has served me well over the years), and get a domain of my own. Furthermore I'll try to add some more aspects of the site, and give it some more structure.
Stay tuned for more info
Monday, August 23, 2010
Friday, August 13, 2010
Perspective in Photoshop pt2
This post is some thoughts on the actual tools I'm using. Now, I'm a firm believer in that it's better to use a small number of tools but to master them well, than the other way around. Photoshop is filled with powerful (some useful, some not so much), but I will stick with the following simple tools.
Use either the line-tool or a brush/pencil to draw the horizon on a new layer (don't use the background one). Since it snaps to your guide, it shouldn't be any problem.


- The brush or the pencil.
- The line-tool
- Rectangle-tool
- Ellipse-tool (for the more advanced stuff ;-) )
- The Ruler-tool
Mind you, there are no shortcuts here (well, there are some, I must admit). You need to know how to draw in perspective. That is, however, not rocket science, and with a decent book, you'll pick it up in no time.
This process is also called straight line perspective, and that suggests that we need to be able to draw straight lines.
- If you use the brush or the pencil, you can either hold down Shift while you are drawing, to get straight lines, either vertically or horisontally. Another feature is that if you click somewhere on the canvas, and then hold down Shift and click on another place, you will get a straight line between the two points.
- If you use the Line-tool, I usually set it up so that it draws directly, without going via a path. Not always though, there are occasions where it helps a lot keeping it as a path first.
So, let's start out simple, and do a basic 1-point perspective box.
Use either the line-tool or a brush/pencil to draw the horizon on a new layer (don't use the background one). Since it snaps to your guide, it shouldn't be any problem.

Draw a simple rectangle face on. This will be the side facing you. My advice is that you let the lines overlap, since that makes it a bit easier to build the block. Remember, this is just the construction phase.

Next, draw a line from one of the corners to the vanishing point. You have to be careful at the end which is at the corner, since it doesn't snap. Repeat this for the other corners as well

Draw a straight lines to give the box volume.
At this stage you have a complete box constructed. It Doesn't look particulary good. You could erase the lines sticking out, but I usually just create a new layer and trace the construction lines. Tip: Lower the opacity of the layer with the construction lines to make it easier to see what you are doing.
At this stage you have a complete box constructed. It Doesn't look particulary good. You could erase the lines sticking out, but I usually just create a new layer and trace the construction lines. Tip: Lower the opacity of the layer with the construction lines to make it easier to see what you are doing.
This was a very easy image to get us started, but I will continue to add in posts to give you more tips on how to work with perspective drawings in Photoshop.
Wednesday, August 11, 2010
Perspective in Photoshop pt1

Setup - Vanishing points and horizon
While it is quite enough to just draw straight lines and mark them with a dot to get a horizon and vanishing points, we will do it slightly more advanced. Not much, mind you.
By using Guides instead, we get a couple of advantages:
- We can place a vanishing point outside of the canvas (something that is needed fairly often in 2 and 3-point perspective)
- We can snap the cursor to the guides, making our drawings a bit more accurate.

To set up the guides, open the View-menu, and select "New Guide. In the dialog that opens, select Horizontal for a ..well.. horizontal line (like the horizon), and vertical for a vertical line. (and yes, that was stating the obvious, I know...)
Anyway, when we have created our guide, we can move it by simply clicking and dragging.
When we have done placing our different guides (I would suggest at least two. One horizontal for the horizon, and one vertical to mark the Vanishing Point for a 1 point perspective. More for a 2 or 3-point perspective).
 |
| Vanishing point outside of canvas |
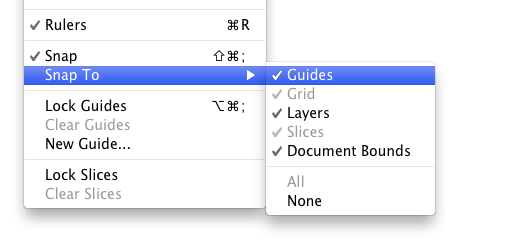
To make our drawing a bit more accurate, I would suggest that Snapping is activated. This way, we are sure that we always hit the vanishing point exactly (see image above). If we need to measure things, I would also suggest activating the rulers, since we sometimes has to split things in half (although there are other ways to do that)
With those things set in place, it's time to start drawing. More on that in a little while.
Sunday, August 08, 2010
Where am I going?
3d-graphics and CGI is hard work, and my advice to those who wants to enter that field is usually the following: Unless you have a burning fire and a passion for it, leave it for something else. There are thousands and thousands people out there who do their best every day to become better and better. Some of them already professionals, some are still amateurs. All of them learn and develop every day!
This is important, for maybe I should apply that advice to myself as well. Yupp, I do love the field of CGI and 3d-graphics. But do I love it enough? And what about it is it that I love? What areas? From time to time it's important to stop and ask yourself those questions. And that's what I'm doing right now.
This blog will remain, and will develop the same way I do. I have some rough idea where I'm going, but I'm not quite there yet. There are things I want to examine, to push further when it comes to CGI, webb and art. What these things are? You are welcome to find out together with me...
Thursday, July 08, 2010
Fun with a physics engine
Sometimes it can be just plain fun to play around with the physics engine of a 3d software or a game. This is one serious construction that someone made using the physics engine in Half Life
Wings in Blender: “Wing Simulation” or “Gaaaaaah…”
This is an interesting post on how they dealt with a dragons wings in in the Durian project (an open source-project using Blender to make a 3d movie)
“Wing Simulation” or “Gaaaaaah…”
“Wing Simulation” or “Gaaaaaah…”
Some simple effects that can be done directly in camera
This short clip demonstrates how you can achieve three different effects without the need of a compositing program or similar.
The effects are rain, sped up background and DFN (Day for Night). One important thing that I think is often forgotten is that the actor must sell the effect as well. If the actor doesn't look cold or wet, we won't believe that it is cold or wet.
The effects are rain, sped up background and DFN (Day for Night). One important thing that I think is often forgotten is that the actor must sell the effect as well. If the actor doesn't look cold or wet, we won't believe that it is cold or wet.
Thursday, June 24, 2010
Stykz - multi-plattform tool for stick figure animation
Stykz is a neat little program for doing simple stick-figure animations. While it may not let you do the next cinema blockbuster, I can see it as a very good tool for practicing your animation skills.
Sunday, June 13, 2010
Free reference pictures

Thursday, June 10, 2010
Tuesday, June 08, 2010
Best 45 free 3d models
CG Digest has published a list of 45 Free 3d-models. They can be used to practice rendering, texturing and lighting.
If you have found a quality 3d model that is not mentioned in the list feel free to post a link to it using the comments form."
Thursday, June 03, 2010
Painting chainmail
Chainmail can be tricky to paint. But with some clever use of brushes, it gets a lot easier, as seen in this video tutorial.
Wednesday, June 02, 2010
Align objects in Maya

It gives you a box around all your selected objects, and symbols (more or less self-explanatory) that you can click for different align operations. For instance, if you want to center all the objects to the last selected object, click the symbol with a line through it.
 |
| Selected objects with the Align Tool |
 | |
| The objects after clicking the centre | icon |

 | |
| Different options for the Align Objects command | . |
Tuesday, June 01, 2010
Textures en masse

Wednesday, May 19, 2010
Do stuff
One of the most important parts of getting better within CGI (or right about anything) is to DO IT! Don't get caught up reading about it, watching tutorials, thinking about it or blogging about it. Just do stuff!!
Unfortunately I'm one of those that have a tendency to just read and research things, and not getting things done. However, I've found a service (hassle.me), that reminds me from time to time to do stuff. One of these things that I'm reminded by is to draw a drawing. This is in an attempt to get better at drawing over time. Not to a profesional level, but to a decent level so that I can make design sketches and perhaps draw the characters I play in various rpgs. My progress is posted on another of my blogs (My path to drawing)
My hope and aim in the coming months is to do the same thing with this blog. Once in a while I'll do a modell, a texture or a rendering to push myself further, and also to post it here.
Friday, May 07, 2010
Houdini Youtube channel
Houdini is one of my favorite 3d-packages out there. Unfortunately, it's a bit tricky to use at times, and to be able to use it fully, you need to get some deeper understanding of the inner workings of it. Up until recently there wasn't that much material on the web for learning Houdini by yourself. However, Sidefx, the guys making Houdini, have started a youtube-channel with loads of tutorials and info to take part of.
Houdini youtube-channel
Houdini youtube-channel
Sunday, May 02, 2010
Writing - My observations so far

- The story should be 50 000 words or more
- I have no particular demands on quality
- The story should be FAIRLY coherent
- I don't want to get stuck editing, so my writing is very much "flow" writing. The aim is to produce text
- I write at least twice a week, and try to get at least 1000 words every session.
- It's easy to forget details, even names and similar. Next time I'll be better at taking notes on all characters so I remember names etc
- Write about characters and events that you enjoy. Otherwise the writing just becomes dull, and your prose will as well.
- When you write, don't be overly critical. It's better to produce heaps of text, and then go back and edit. Being critical while you are writing limits you and stops the flow
Saturday, April 24, 2010
Home bult stabilizers

To help the aspiring film-maker, the site Homebuild stabilizers contains heaps of advice on how to build your own stuff.
Monday, April 19, 2010
Cloud generator
 Blender, the open source 3d-software, is now in it's second alpha-stage of the 2.5 version. One interesting script that is created for it is a Cloud Generator script. Blendernation says:
A cloud generator script has recently been completed to aid in the creation of clouds in Blender 2.5. It uses boxes to allow an artist to individually sculpt each cloud to the size and shape of the aritists liking. I cloud can be created with all materials added in literally two mouse clicks.
Read more about the Cloud Generator Script for Blender 2.5
Saturday, April 17, 2010
Abstract drawings with Flame
Flame is a neat little web-application that easily lets you create abstract drawing to use for desktop backgrounds, parts of webpages etc. And also, it's fun to just play around with.


Wednesday, April 14, 2010
First minute from the Durian project
The Durian project is a collaborative project, building a 3d-movie using only open-souce software (primarily Blender). A little while ago they published the first minute of animation on their web-page. It looks good from what I can see!
Read more on the project on the Durian Webpage
Read more on the project on the Durian Webpage
Thursday, April 08, 2010
Image sequence to video-file via Blender
It is often recommended that you render out a 3d-animation not as a video-file but as a sequence of image files. Now, this leaves you with the task of converting this image sequence to a video-file in some other way. Of course, almost all video editing packages can do this, but what are the free options. One often overlooked tool for this purpose is Blender (an open-source 3d-package), which includes some basic video-editing functionality. In the video below I've tried to outline the basic steps for converting an image sequence to a (in this case) quicktime MOV-file.
Tuesday, April 06, 2010
Mini-tip: Working from multiple locations via Dropbox
I'm currently working on a Maya-project where I sometimes work from my office and sometimes from my home. I thought I'd share a small tip on how to do this without to much headache.
The solution is rather simple, and also makes it possible for multiple co-workers to work on the same project (although I wouldn't try to work on the same file).
First of all, I have a dropbox-account (which can be created for free). Then, after I have installed the client, I open Maya.
Now, Dropbox creates a folder on your hard-drive where you can add files. These files are then accesible from any other computer where you have installed dropbox and connected it to your account.
When I have my Dropbox in place, then I start to work in Maya. So, create a new project, but don't place it in the default location, but instead, place it in your dropbox folder. Whenever you change something in your files, it's updated in the dropbox folders on all your computers (as long as they are connected to the Internet, of course).
Additionally, you can share a folder with other Dropbox users, which means that you can share your project folder, and work together with multiple people on the same project.
Finally, this also serves as a decent backup if something should go very wrong.
Sunday, March 28, 2010
Clockwork man - a prototype
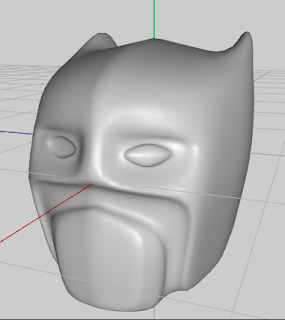
 This year, one of my aims is to make a short movie in 3d. The basic idea is to build a story around a Batmanesque clockwork-inspired robot.
 So far, I've modelled an early prototype of what he can look like. It's not much, but it's at least something to use as a foundation when trying out concepts and animations.
Subscribe to:
Posts (Atom)