Showing posts with label Maya. Show all posts

Wednesday, June 02, 2010

Align objects in Maya

 One question that I get every time I have a Maya class is how you can align objects. In earlier versions of Maya, that was semi-tricky, but after a while they added some nice align possibilities to Maya. One quick and easy way is the Align Tool. It is found under Modify (see pic)
It gives you a box around all your selected objects, and symbols (more or less self-explanatory) that you can click for different align operations. For instance, if you want to center all the objects to the last selected object, click the symbol with a line through it.
Selected objects with the Align Tool
 Another option is to use the Align Objects-command (preferably clicking the Options-box, so that you get the different ...eh.. options).
The objects after clicking the centre icon


Different options for the Align Objects command.

Tuesday, April 06, 2010

Mini-tip: Working from multiple locations via Dropbox

I'm currently working on a Maya-project where I sometimes work from my office and sometimes from my home. I thought I'd share a small tip on how to do this without to much headache.

The solution is rather simple, and also makes it possible for multiple co-workers to work on the same project (although I wouldn't try to work on the same file).


First of all, I have a dropbox-account (which can be created for free). Then, after I have installed the client, I open Maya.

Now, Dropbox creates a folder on your hard-drive where you can add files. These files are then accesible from any other computer where you have installed dropbox and connected it to your account.

When I have my Dropbox in place, then I start to work in Maya. So, create a new project, but don't place it in the default location, but instead, place it in your dropbox folder. Whenever you change something in your files, it's updated in the dropbox folders on all your computers (as long as they are connected to the Internet, of course).


Additionally, you can share a folder with other Dropbox users, which means that you can share your project folder, and work together with multiple people on the same project.

Finally, this also serves as a decent backup if something should go very wrong.

Sunday, March 28, 2010

Clockwork man - a prototype

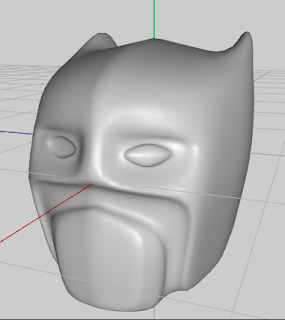
This year, one of my aims is to make a short movie in 3d. The basic idea is to build a story around a Batmanesque clockwork-inspired robot.

So far, I've modelled an early prototype of what he can look like. It's not much, but it's at least something to use as a foundation when trying out concepts and animations.

Friday, November 13, 2009

Maya mini-tip: Snap Together Tool

Recently I've discovered a tool that I havn't looked into before. It's called the Snap Together Tool, and can be found under the Modify Menu.

Basically, it's a tool for placing objects in a scene. It works like this:

  • Activate the tool
  • Click on the object you want to move. Be careful to click at the surface that you want fix to the other object. For instance, if you want to place an object on the floor, click on the underside of the object.
  • Click on the object where you want to place the object.
  • The first object will jump to where you clicked, making the first point/surface connect to the second point.

This is very handy when placing things on surfaces, and is very fast. See the included video for a quick demo:


Tuesday, October 06, 2009

What's happening with Maya?

Today, on my workplace, I finally got to install Maya2010 and see what new things it contained.

The answer: Basically nothing! All the changes are external from the actual software (Complete-version dead, Toxic and Matchmover included etc), but within Maya, almost nothing has changed.

So, what is happening? Is maya going the way of the Dodo?

I don't think so. I do think 2010 is a dissapointment, but I also think there is a reason for it. From what I've gathered on forums like CGTalk etc, it seems that a major overhaul of Maya is underway. For instance, the GUI-handler will be replaced by something that will be a bit faster, a lot more cross-plattform-able.

My own guess is that the Maya-developers are busy working on the new version, rather than adding things to the "old" platform. So, let's keep our fingers crossed for a nice and impressive release of Maya 2011.

Sunday, July 13, 2008

Animating a piston in Maya


Making a piston move correctly can be tricky, but here is a way to do it. I'm using expressions to solve it, because this makes it a bit easier and manageable.

First of all, consider this picture:
The distance between the center of the wheel is the sum of x1 and x2. Finding x1 is simple trigonometry (x1 = cos(rotation of the wheel)*L1).

Finding x2 is a bit trickier. Not much though.

Y, L2 and X2 also forms a triangle. We can set L2 to whatever length we want it to. Y varies with the rotation, and can be found with sin(rotation of the wheel)*L1.

So, we know have L2 and Y, and using Pythagoras theorem, we can calculate x2.

The code can look something like this:

float $l2 = 10; // Decide on L2
float $y = LOC_Radius.translateY*sind(LOC_Center.rotateX+90); //Calculate Y
float $x1 = LOC_Radius.translateY*cosd(LOC_Center.rotateX-90); //Calculate x1

float $x2 = sqrt($l2*$l2-$y*$y); //Calculate x2 from y and L2
LOC_Piston.translateZ = $x1+$x2; //Add x1 and x2 together to get the total translation.


LOC_Radius - where the first cylinder connects to the wheel
LOC_Center - Center of the wheel
LOC_Piston - the "pushing point" of the piston

After that, I just added some geometry to the locators so that it looks like a wheel and a piston. Mostly done with some parenting, point constraings and one aim constraint.

The result can be seen here:

Wednesday, August 15, 2007

Interactive Creation in Maya

One of the things Autodesk introduced in Maya was the interactive creation. In it's normal workmode, that means that you click and drag on the grid to place and scale your object. However, there are some extra little details that can be worth remembering.

First of all, remember that planes and cubes are created differently than other primitives. With the first click, the corner is placed and then you drag out the other corner. With the other primitives, you place the center with the first click, and then drag out the radius.

If you press the control-button when creating a cube or a plane, it is placed as above, but when you drag out the height, it grows so that it's center is at the ground plane (as compared to having it's base on the ground plane normally).

If you press the shift-button when dragging (regardless of object) it is created equally large in all directions, and it's base rests on the ground plane.

Finally, Ctrl+Shift makes a cube behave just like the other primitives in that it is created with the same dimensions in all directions, and it's center is on the ground plane.

You can also double-click instead of click-and-drag, and that creates a primitive with size (for cubes and planes) or radius (for spheres and similar) 1 in all directions, with it's center on the ground plane at the spot you double clicked.

Another little nice detail: In the menu Create -> XXXX Primitives there is an option Exit on completion. If this option is unchecked, you don't leave the creation mode when a primitive is created. This way, you can rapidly create a large number of primitives just by clicking and dragging.

From Maya 8.5 there is also a tool option that let's you adjust different parameters after creation. Create -> Polygon Primitives -> Cube (as an example) and click the square to open the options window. There should be a heading After Creation Settings. If you activate Adjust Subdivisions, you can set the number of subdivisions by click and drag when you have created your primitive.

Finally, you can activate the Snapping-funtions to snap your primitives to a grid or a live object, for instance.