Saturday, April 24, 2010

Home bult stabilizers

Using stabilizers and other contraptions for getting better camera movements can be a big factor in how a film looks. Unfortunately, such things aren't particulary cheap.

To help the aspiring film-maker, the site Homebuild stabilizers contains heaps of advice on how to build your own stuff.

Monday, April 19, 2010

Cloud generator


Blender, the open source 3d-software, is now in it's second alpha-stage of the 2.5 version. One interesting script that is created for it is a Cloud Generator script. Blendernation says:
A cloud generator script has recently been completed to aid in the creation of clouds in Blender 2.5.  It uses boxes to allow an artist to individually sculpt each cloud to the size and shape of the aritists liking.  I cloud can be created with all materials added in literally two mouse clicks.

Read more about the Cloud Generator Script for Blender 2.5

Saturday, April 17, 2010

Abstract drawings with Flame

Flame is a neat little web-application that easily lets you create abstract drawing to use for desktop backgrounds, parts of webpages etc. And also, it's fun to just play around with.

Wednesday, April 14, 2010

First minute from the Durian project

The Durian project is a collaborative project, building a 3d-movie using only open-souce software (primarily Blender).  A little while ago they published the first minute of animation on their web-page. It looks good from what I can see!


Read more on the project on the Durian Webpage

Thursday, April 08, 2010

Image sequence to video-file via Blender

It is often recommended that you render out a 3d-animation not as a video-file but as a sequence of image files. Now, this leaves you with the task of converting this image sequence to a video-file in some other way. Of course, almost all video editing packages can do this, but what are the free options. One often overlooked tool for this purpose is Blender (an open-source 3d-package), which includes some basic video-editing functionality. In the video below I've tried to outline the basic steps for converting an image sequence to a (in this case) quicktime MOV-file.

Tuesday, April 06, 2010

Mini-tip: Working from multiple locations via Dropbox

I'm currently working on a Maya-project where I sometimes work from my office and sometimes from my home. I thought I'd share a small tip on how to do this without to much headache.

The solution is rather simple, and also makes it possible for multiple co-workers to work on the same project (although I wouldn't try to work on the same file).


First of all, I have a dropbox-account (which can be created for free). Then, after I have installed the client, I open Maya.

Now, Dropbox creates a folder on your hard-drive where you can add files. These files are then accesible from any other computer where you have installed dropbox and connected it to your account.

When I have my Dropbox in place, then I start to work in Maya. So, create a new project, but don't place it in the default location, but instead, place it in your dropbox folder. Whenever you change something in your files, it's updated in the dropbox folders on all your computers (as long as they are connected to the Internet, of course).


Additionally, you can share a folder with other Dropbox users, which means that you can share your project folder, and work together with multiple people on the same project.

Finally, this also serves as a decent backup if something should go very wrong.

Sunday, March 28, 2010

Clockwork man - a prototype

This year, one of my aims is to make a short movie in 3d. The basic idea is to build a story around a Batmanesque clockwork-inspired robot.
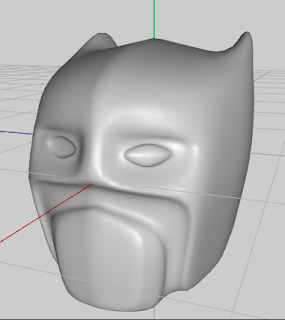
So far, I've modelled an early prototype of what he can look like. It's not much, but it's at least something to use as a foundation when trying out concepts and animations.

Friday, November 13, 2009

Maya mini-tip: Snap Together Tool

Recently I've discovered a tool that I havn't looked into before. It's called the Snap Together Tool, and can be found under the Modify Menu.

Basically, it's a tool for placing objects in a scene. It works like this:

  • Activate the tool
  • Click on the object you want to move. Be careful to click at the surface that you want fix to the other object. For instance, if you want to place an object on the floor, click on the underside of the object.
  • Click on the object where you want to place the object.
  • The first object will jump to where you clicked, making the first point/surface connect to the second point.

This is very handy when placing things on surfaces, and is very fast. See the included video for a quick demo:


Sunday, October 11, 2009

Subscription based models

A few months ago, Digital Tutors introduced their subscription based model. Instead of buying individual tutorials, you pay a fee to get access to all their material.

Not long ago, Gnomon Workshop followed suit. They have three tiers, Visual Effects only, Design only , or all tutorials. Pay a yearly fee and get access to all Visual Effects-tutorials, all Design-tutorials or all tutorials whatsoever.

The advantage with this that I can see is that you don't have to choose. As long as you are a subscriber, you have access to all tutorials and can take a look at them as the need arises.

The disadvantage is just that, it's only as long as you are a subscriber. Stop your subscription, and you lose all the tutorials again. Basically, you are paying for something that you can't keep.

(Of course, nothing is stopping you from taking notes etc, but sometimes it's just not the same thing).

One difference I can see between Digital Tutors and Gnomon is that you can get montly subscriptions for DT, while Gnomon only let's you subscribe on a yearly basis. This makes the step into DT a bit smoother, you can try it out for a month before commiting several 100 USD to the service for a yearly subscription.


Tuesday, October 06, 2009

What's happening with Maya?

Today, on my workplace, I finally got to install Maya2010 and see what new things it contained.

The answer: Basically nothing! All the changes are external from the actual software (Complete-version dead, Toxic and Matchmover included etc), but within Maya, almost nothing has changed.

So, what is happening? Is maya going the way of the Dodo?

I don't think so. I do think 2010 is a dissapointment, but I also think there is a reason for it. From what I've gathered on forums like CGTalk etc, it seems that a major overhaul of Maya is underway. For instance, the GUI-handler will be replaced by something that will be a bit faster, a lot more cross-plattform-able.

My own guess is that the Maya-developers are busy working on the new version, rather than adding things to the "old" platform. So, let's keep our fingers crossed for a nice and impressive release of Maya 2011.

Saturday, September 19, 2009

Just some pictures.. and a secret!!!


Today I went out to a nearby path that runs along a river (just a few minutes drive from where I live) and took some pictures.
The equipment is my Nikon D90 with the stock objective that comes with it (which I know isn't the best there is)

However, I'm quite pleased with how the photos turned out, and I owe it all to one secret:

I was there at the right time!

When it comes to landscape photography like this, the time of day is crucial. The fact that I left my warm and cosy bed at 7.20 on a saturday resulted in me getting a fair amount of decent pictures with nice light and greath atmosphere (including a couple of pictures of our new Subaru Legacy as well).

When I was at the place, it was just a matter of taking as many pictures as possible.
Another small tip I can give is to use a tele-objective with as much zoom as possible. This enhances the influence of any fog or mist in the air and gives more depth to the images.

Wednesday, June 17, 2009

Fusion 6 is on it's way

One of my favorite packages is Fusion from Eyeon. About two months ago I was at an early demo of the upcoming version, 6.0 and it looked impressive (well, Fusion looks impressive as it is, so that was no surprise there). However, at that time the release was quite far away. Fortunately, it isn't anymore. It seems like they have an open release candidate for their current subscribers.

For more on the new version, read on this link on Fusion 6.0

Sunday, June 14, 2009

Blender 2.5 - a preview

The next major version of Blender, 2.5, is slowly maturing. All around the net, previews are leaking out. This video is one preview that shows a little bit about the interface.

Blender 2.5, - Got flexible? from Pablo Vazquez on Vimeo.


You can read more about blender on blender.org


Friday, June 12, 2009

Free image editors

Adobe Photoshop is a great tool, but it's also an expensive one. Six Revisions have put together a summary of 10 good open-source/free Image Editing tools to try out if Photoshop is out of your reach economically.

10 Excellent Open Source and Free Alternatives to Photoshop


Wednesday, June 10, 2009

Photo tips

This post in the blog Prophotolife contains a number of interesting links with resources for digital photography.

atn 36: links from creativity to photo instruction


Interesting thread on matte painting

This thread shows an interesting workflow when it comes to matte painting. It's a nice read if you are interested in finding new workflows/ getting new ideas for painting sceneries in Photoshop (for instance).

Sunday, July 13, 2008

Animating a piston in Maya


Making a piston move correctly can be tricky, but here is a way to do it. I'm using expressions to solve it, because this makes it a bit easier and manageable.

First of all, consider this picture:
The distance between the center of the wheel is the sum of x1 and x2. Finding x1 is simple trigonometry (x1 = cos(rotation of the wheel)*L1).

Finding x2 is a bit trickier. Not much though.

Y, L2 and X2 also forms a triangle. We can set L2 to whatever length we want it to. Y varies with the rotation, and can be found with sin(rotation of the wheel)*L1.

So, we know have L2 and Y, and using Pythagoras theorem, we can calculate x2.

The code can look something like this:

float $l2 = 10; // Decide on L2
float $y = LOC_Radius.translateY*sind(LOC_Center.rotateX+90); //Calculate Y
float $x1 = LOC_Radius.translateY*cosd(LOC_Center.rotateX-90); //Calculate x1

float $x2 = sqrt($l2*$l2-$y*$y); //Calculate x2 from y and L2
LOC_Piston.translateZ = $x1+$x2; //Add x1 and x2 together to get the total translation.


LOC_Radius - where the first cylinder connects to the wheel
LOC_Center - Center of the wheel
LOC_Piston - the "pushing point" of the piston

After that, I just added some geometry to the locators so that it looks like a wheel and a piston. Mostly done with some parenting, point constraings and one aim constraint.

The result can be seen here:

Sunday, April 27, 2008

Command line rendering and render queues in Maya

One little nifty trick one can do is to use the command line renderer that ships with maya. Or rather: When you start the Batch render -process from within maya, you are actually starting a separate process. Thing is, you can start this process from outside of maya, using just the command prompt. There are some advantages to this, two of these are
- Not having to spend system resources on Maya itself, the renders are slightly faster
- With a simple trick, you can put multiple scenes on queue.

The basics are simple, just open a command prompt from windows (or open the Maya Terminal in OSX). type Render myscene.mb.

Now, there are many flags you can set when using this command, but if everything is set in maya, that is all there is to it. Some other useful flags follow here:

-x int and -y int : The resolution of the Render
-s int and -e int: The starting frame and the last frame of the render
-rd : output directory
-im : output image file name

Render Queue

In windows, you have something called batch-files. These are text files that can contain several command prompt commands. For instance, you can create a file called myRenders.bat. In it you have two lines
Render scene1.mb
Render scene2.mb

When you run the batch-file (double click it or type myRenders.bat in the command prompt, the two commands will run after each other. In this case, you will render out first scene1 and then scene2.
This is useful if you have multiple scenes you want to render overnight. Just type a number of Render-commands in a batch file and you are ready to go.

With the use of flags, you can make multiple renders of the same scene as well. For instance, it would be easy to make a batch-file that did both the entire scenes, and also rendered out a particular frame from each scene in higher resolution (if you would want something like that.)

Monday, April 07, 2008

New book on Renderman

Two days ago I recieved a book I ordered. It's called The Renderman Shading Language Guide and is a thorough introduction to shader programming using the Renderman Shading Language.

So far it seems very good, although it focuses perhaps a bit to much on peripheral things like how to put up a good development environment rather than the actual programming. With that said, however, it seems like it goes into a great depth on shader programming. I will return with a more exhaustive review when I have read it through.

The official site of the book

Wednesday, April 02, 2008

3Delight - A high-end production Renderman renderer

I have been interested and fascinated by the Renderman renderer for quite some time now. It has, however, been slightly out of my reach due to it's costs. After looking at some of the open-source solutions out there I finally found the 3Delight engine. It's a profesional Renderman compliant engine that is used in high-end productions. It also integrates with Maya and XSI.

The cool thing is that they let you use the first license for free, including for commercial use. I have recently downloaded it and done some simple tests. I will return with more info and tips when I get more experience with it.

If you want to try it out for yourselves, the link is www.3delight.com