We should be taught not to wait for inspiration to start a thing. Action always generates inspiration. Inspiration seldom generates action.// Frank Tibolt
This applies to me a lot. I'm not always the most focused or persevering guy, and sometimes I have to reminde myself that real progress is done with hard work through tough times. Not easy always, but that's my aim
/McW
Wednesday, September 13, 2006
Tuesday, August 08, 2006
Short tip on "double constraining"
Posted by tfall on cgtalk regarding rigging an object so that two objects can control it independently of each other:
pointConstrain control A to control B. Then connect control C's translateX, translateY, and translateZ to the pointConstraint's offsetX, offsetY, and offsetZ respectively. Control B and control C will have independent control over the position of control A.
pointConstrain control A to control B. Then connect control C's translateX, translateY, and translateZ to the pointConstraint's offsetX, offsetY, and offsetZ respectively. Control B and control C will have independent control over the position of control A.
Tuesday, June 06, 2006
Speed Modelling
 A picture I made for a speed modelling session on www.grafisktforum.org.
3½ hours. Modelling done in Wings3d, posing and rendering done in Maya.
Thursday, May 25, 2006
Maya and shading
This guy http://www.digitalartform.com/has some interesting thoughts on shading like a painter.
Well worth a read.
Well worth a read.
Sunday, May 21, 2006
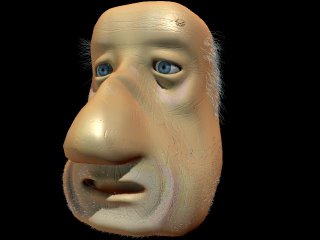
Fisherman's head
 My latest little work. Modelled in Wings3d and rendered etc in Maya.
Bump maps are used for details in the skin. A specularity map is used to make sure that only some parts of the modell is shiny. All maps ar made using the Paint Tool in Maya.
A single Fur Description is used for all hair, with the attributes painted in (Length and Baldness).
The eyes are made with Nurbs spheres with one of the poles pointing forward. The texture is a combination of ramps. The first one is the basic eye structure, going from black to blue, dark blue and then white. The blue part (the iris) is then made into a new ramp that basically is several bands going from darker to lighter blue. This ramp goes in the other direction compared to the first ramp.
Samt goes for the third ramp, which is mostly white with a couple of red/ white-red stripes going from the iris outward. Adding a slight level of noise gives makes for simple veins in the eye.
Subscribe to:
Comments (Atom)